


News
How to Customize Your Own Handmade Winter Hat
Last Updated: November 2, 2026
Quick Summary
Customizing your own handmade winter hat means starting with a base hat that fits, then adding colorwork, logos, text, or patches. Plan colorwork on a beanie design template, and use no-sew options like iron-on patches, HTV, or DTF transfers for logos. Always test heat on a scrap first so you don't scorch acrylic.
- Match your thread to your yarn fiber when prepping your base hat.
- Crochet a 4-inch test square to check gauge before starting.
- Keep floats loose on the back so colorwork hats still stretch.
- Press through a cloth and test on a scrap to avoid melting synthetics.
- Wash customized hats inside out in cool water and lay flat to dry.
Table of Contents
- What You'll Need Before You Start Customizing
- How to Make a Beanie Crochet: A Start-to-Finish Walkthrough
- Choosing a Custom Beanie Design That Fits Your Style
- Using a Beanie Design Template for Colorwork and Patterns
- Adding Custom Beanies with Logo, Text, or Patches
- Common Mistakes and How to Avoid Them
- Caring for Your Customized Hat So It Lasts
- Pick a Base Beanie and Start Customizing
- Frequently Asked Questions
What You'll Need Before You Start Customizing
Customizing your own handmade winter hat starts with the right base and a few basic tools. The prep work decides how the finished piece looks. Get this part right and the rest is easy.
Here is your starter kit:
- A base hat: knit, crochet, or a store-bought blank
- Yarn or thread that matches your fiber content
- A tapestry needle for weaving in ends
- Sharp fabric scissors
- Pins or clips to hold pieces in place
- A measuring tape for fit checks
Fabric choice matters most. A wool blend holds shape and warmth. Acrylic is soft, cheap, and easy to wash. Cotton breathes but stretches.
Match your thread to your yarn fiber.
How to Make a Beanie Crochet: A Start-to-Finish Walkthrough
Making a crochet beanie from scratch is a manageable first project. The process is simple once you see the order of steps. Here is the full sequence.
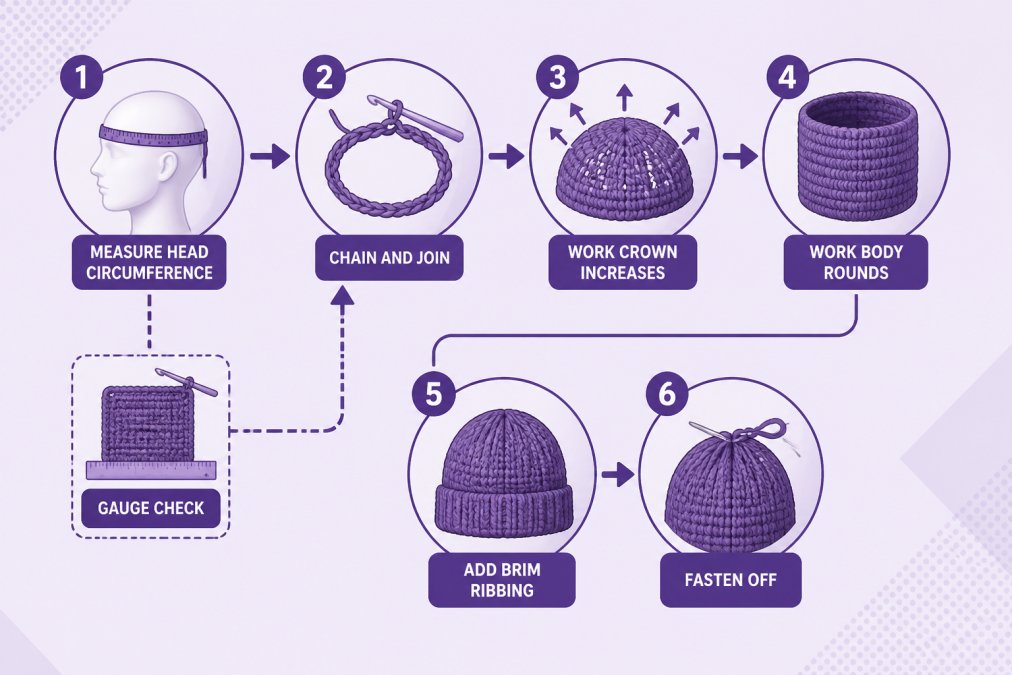
- Measure the head. Wrap your tape around the widest part, just above the ears.
- Check your gauge. Crochet a small square and count your stitches per inch.
- Chain and join into a ring.
- Work the crown in increases until the circle matches your head width.
- Work the body in even rounds until the hat reaches your target depth.
- Add the brim in ribbing for stretch.
- Fasten off and weave in your ends.
Working the Crown, Body, and Brim
The crown is where fit is won or lost. Too few increases and the hat pulls tight. Too many and it bunches at the top.
Work your increases in even wedges around the circle. Most patterns use six to eight wedges. Once the circle is wide enough, stop increasing and work straight rounds for the body. The brim comes last: switch to a smaller hook and work ribbing for a snug, stretchy edge. Once the brim is finished, small changes to the stitch pattern or crown shaping can make the hat your own, and exploring unique crafting patterns may spark ideas for your next variation.
Getting Gauge and Fit Right
Gauge is the number of stitches and rows per inch in your fabric (YDKWYDK: Gauge and why it's important). It is the single biggest reason handmade hats come out too small or too big.
Crochet a test square before you commit. Understanding beanie materials and warmth helps you choose the right yarn first. If your square has more stitches than the pattern calls for, size up your hook. Fewer stitches means size down. Always measure the head, not the hat you already own.
Choosing a Custom Beanie Design That Fits Your Style
A custom beanie design should match how you actually dress, not just what looks good on a screen. Start with one focal point and build around it. Too many elements fight each other.
Pick a direction:
- Bold and graphic: big logos, high-contrast colorwork
- Cozy and classic: pom-poms, cable knits, muted tones
- Playful: faces, characters, novelty motifs
What most guides miss: the hat's silhouette limits your design. A tall, slouchy hat gives you room for a wraparound pattern. A snug cuff hat works better with a single small motif.
Using a Beanie Design Template for Colorwork and Patterns
A beanie design template is a grid map of your hat's stitches, used to plan colorwork before you knit or crochet a single row. It turns a rough idea into a repeatable pattern.
Templates help you:
- Map exactly where each color lands
- Keep motifs centered on the front
- Repeat patterns evenly around the hat
- Catch sizing errors before you waste yarn
Graph paper works fine for beginners. Count your stitches per round, then draw your design to scale. For colorwork, keep floats loose on the back so the hat still stretches.
Adding Custom Beanies with Logo, Text, or Patches
Custom beanies with a logo, text, or patch turn a plain hat into a personal piece. You do not need a workshop to do it. Three methods cover most projects.
No-Sew Options: Iron-On Patches, HTV, and DTF Transfers
No-sew customization is the fastest route and needs no special skills.
- Iron-on patches: place, cover with a cloth, and press with a hot iron.
- Heat-transfer vinyl (HTV): cut your design, weed it, and press it onto the fabric.
- DTF transfers: full-color prints that press on in one step.
Watch out: too much heat scorches acrylic and melts synthetic fibers. Always press through a cloth and test on a scrap first.
Common Mistakes and How to Avoid Them
Most custom hat failures come down to a few repeat problems. Here is how to dodge them.
| Mistake | Fix | Impact |
|---|---|---|
| Skipping the gauge swatch | Crochet or knit a 4-inch test square | Prevents too-small or too-big hats |
| Pressing too hot | Use a cloth barrier and low heat | Avoids scorched or melted fibers |
| Overstretching during pressing | Press flat, do not pull | Keeps the hat's shape |
| Crowding the design | One focal point per hat | Keeps the look clean |
| Weak patch adhesion | Press longer, check edges | Stops patches peeling in the wash |
Caring for Your Customized Hat So It Lasts
Wash your customized hat gently to keep the design intact, but the right routine depends on which customization method you used. Heat and friction are the two things that break down patches, vinyl, and embroidery, and each one fails in a different way.
How each method ages.
- Embroidery: the most durable option. Thread and stabilizer tolerate repeated washing, and the main failure is pilling or fuzzing on the surface rather than the stitching coming loose.
- Iron-on patches: the glue is the weak point. A patch that survives the first wash usually survives many, but a hot dryer softens the adhesive and lets edges curl. Patches on a stretchy cuff peel sooner than patches on the flat body.
- HTV: cracks before it peels. Vinyl has limited stretch, so it fails at the edges of a design on a ribbed or high-stretch area, and hot water accelerates the cracking. A well-pressed HTV design on the flat body of a cotton-blend hat can last seasons; the same design on an acrylic cuff may crack within a few washes.
- DTF transfers: the printed film can lift at the edges if washed hot or dried on high heat. Cold-peel DTF applied correctly tends to hold well, but the ink layer is the part that shows wear first.
A wash routine that works for all four.
- Turn the hat inside out so the design faces inward and rubs against itself rather than the drum.
- Hand wash in cool water with a mild, bleach-free soap. If you machine wash, use a mesh laundry bag and the delicate cycle.
- Skip fabric softener, it coats fibers and can loosen adhesive on patches.
- Do not wring or twist. Press the water out between two towels.
- Lay flat to dry, reshaping the crown and brim while damp. Never hang a wet hat; the weight stretches the knit (How do I dry wool?).
- Keep it out of the dryer. The heat that sets a patch also softens it, and the tumbling is what cracks vinyl.
Winter-specific care. Road salt, slush, and repeated freezing and thawing stress the fibers more than a wash cycle does. Rinse salt residue with cool water and let the hat air dry away from a radiator or vent, direct heat dries the knit unevenly and can shrink wool. Store the hat flat or stuffed with tissue rather than hung on a hook, which stretches the crown over time.
When to repair instead of replace. A lifting patch corner can be re-pressed through a cloth. A cracked HTV edge can sometimes be trimmed and re-pressed, but once vinyl cracks across a design it will keep cracking. Loose embroidery thread can be knotted on the inside and trimmed. A hat that has been washed hot and shrunk is usually not recoverable, which is why the wash temperature matters more than any other single habit.
Pick a Base Beanie and Start Customizing
Starting with a base hat that already fits and feels right can save time. Crazy Beanies builds bold, limited-edition headwear using 3D knit technology, handcrafted in the USA, with pieces that ship in 24 hours or less.
Browse the full collection to find your next favorite hat. Every hat is designed for a cozy, fake-proof fit and a silhouette that stands out. Start with one of our favorites:
- Pirate ($29.95): an embroidered skull-and-crossbones knit with a gold accent, built for bold everyday wear.
- Cozy Cabin ($28.95): a snowy cabin scene with a fluffy white pom-pom, knit and finished in the USA.
- Sleepy ($28.95): a pale-blue, ultra-soft acrylic knit with an offset sleepy-eyed design.
- CrazyOG ($29.95): the graffiti-logo original on a sleek black knit, made for streetwear fits.
Get started with Crazy Beanies and turn a plain winter hat into something only you would wear.
Frequently Asked Questions
How can I customize a handmade winter hat without sewing?
Iron-on patches, heat-transfer vinyl (HTV), and DTF transfers all work on knit beanies without a needle. Test on an inconspicuous spot first, and follow the heat instructions on your patch or vinyl packaging.
What does it cost to make a handmade winter hat from scratch?
A beginner crochet or knit hat typically runs $15-$30 in materials: one skein of worsted-weight yarn ($6-$12), a crochet hook or needle set ($8-$15 if you don't own one), and a tapestry needle ($3). Add $3-$8 for a pom-pom, patch, or embroidery floss. That puts a finished handmade hat in the same range as a mass-market beanie but with a one-of-a-kind result. Expect 4-8 hours of work for a first project.
How do I add a logo or custom text to a beanie?
For a clean logo on a finished knit hat, embroidery gives the most durable result: digitize the logo, hoop the hat with stabilizer, and stitch at least 4,000 stitches for detail. For small runs, a DTF transfer or HTV cut on a vinyl cutter works and needs no embroidery machine. Keep text at 0.5 inches tall or larger so it stays legible on ribbed knit, and avoid placing transfers directly over the brim fold where flexing loosens the bond.
How do I wash a customized winter hat without ruining the design?
Follow the care instructions for your hat and any patch or vinyl you applied.
